4.24.2014

A Little Update.

I realize I've been slacking! I've made lots of stuff but haven't posted anything. Aiming to change that now.

Few months back I started knitting gloves. I'm forced to retire from amigurumi for now since the local yarn shops don't stock the yarn I use for them, or anything with a skin color I'm happy with. So instead of spending lots of money on an amigurumi using expensive yarn, I opted to make clothing and accessories instead. Starting with gloves, because winter in England is so much colder than it is back home... brrr....


The gray pair pictured above is a present for my boyfriend. Sadly, when I return to Taiwan it'll be summer so it won't be much use to him then XD I love the design, the whole thing was quite simple but had that added twist. You can find the pattern here: http://goodforaboy.com/blog/?paged=3

And for myself I made a pair of long fingerless gloves in forest green. 


The pattern is the Seeta fingerless gloves by Maria Sheherazade and can be found here: http://www.ravelry.com/patterns/library/seeta-fingerless-gloves

I love fingerless gloves. Sure, my fingertips are a bit colder but at least I can get things done. I don't know if my fingers are extra pudgy or something, but for me the fingers are always just a bit too long which made doing anything nearly impossible. 

I've really started to come around to knitting in rounds. In the span of a month 3 circular needles were added to the collection. 

I've also made a caplet, and recently started sewing. I haven't photographed these yet, waiting for a nice and sunny day and a photographer. (I miss you so much, Esther!!!)

That's it for now~ In the next few posts I'll document some traveling I've been doing whilst in the UK =)

2.08.2014

Vintage Home Decor DIY: Boundless Books

     I was browsing Youtube the other day and found this awesome tutorial for beautiful vintage-styled boundless book paper bundles. The tutorial is done by Jc frias, who does amazing home decor/diy videos! Go check him out, he's got some wonderful tutorials I want to try!!! So anyway, the instructions seem so simple and the result looks so beautiful I just had to give it a go, so I went to town and got myself the meterials right away!!

This is how it turned out~~ Posed with my new budding collection of vintage keys > w <


    Oh, just on a side note, you'll notice that the background to my photos are different, that's cause I'm currently studying abroad in the UK! So I'm now living at my new dorm room~

The tutorial in the video is super simple, but I'll walk you through my process anyways.

You'll need some books, preferably thick hardbacks. You can usually get them cheap at thrift stores, so keep an eye out. I found a copy of Pride and Prejudice that would be perfect, but the thought of tearing through that gave me the chills so I left it alone. I got mine just under a pound each.

I practically grew up in a pile of books, so ripping the cover off like I did was a painful process, but eventually I got the binds off. I don't have a lighter, and I didn't want to risk the smoke detector in my room going off, so instead of running a lighter along the spine, I heated the spine on some foil over the stove to melt the glue and peel it off.


I got a fantasy novel, which means it has maps inside. I really liked the looks of them, so I carefully tore these out for later use.

Next is time to age the books. The copies were actually already kind of yellowed, but I wanted to distress it further, so I brewed some strong tea, and used the teabag as a painting tool to dye the pages. The video recommended coffee grounds, which gives a much darker shade, but I drank all my coffee and hadn't bothered to go to the super since so tea is all I have. One thing to take note is that it's important to get the edges and sides dyed, or it'll look unnatural.


It looks quite white in the photo, but it's all stained up and ready to go! Get some twine and tie your bundle up, and you're all set!

Time to get my hands on the maps I set aside! This time after dousing in tea for 5 minutes, I put it in the oven at 200F and left it for about 7 minutes. (You want to check it often, as you certainly don't want it to burn up!

Here's how they turned out:


I made a few rips and tears and curled some bits to really give them a aged look. I love how they turned out! I've arranged all this on my bedside table and I just get so happy every time I turn around!

Now I'm just gonna find a craft for the covers... hmm... they're long enough for my knitting needles to fix lengthwise... perhaps a craft supply holder? I can arrange needles and stitch markers and such~

2.04.2014

Bird or Cage? - Bioshock Infinite Elizabeth Necklace Tutorial

Should have typed this up ages ago, I've been wearing the necklaces around for months. But anyway here goes.

As anyone familiar with the game will know, in the beginning half of the game Elizabeth meets the Luteces, who presents her with two brooches, bird or cage. 


I thought they were absolutely lovely, and of course I set off to make my very own. 


I made the bird one earlier on, and the one with the cage is modified from it. The one with the cage is more authentic, so it'll be the subject of this tutorial. Unfortunately I didn't take photographs while making these, but I'll try to explain it as clearly as possible.

The trickiest part is, of course, getting the brooches. The cage one is a birthday present from my boyfriend, who ordered it from Etsy <3 If you don't want to order it from someplace else, you can make your own. I made the bird one myself.

Okay, so first you'll need an image to work with. I got the images from screenshots and used Photoshop to modify the lighting and so on. 

Here are the images I rendered, along with ones of Possession and Murder of Crows, feel free to use them if you like =) 

I ordered empty pendants from a local online store. Mine came with glass beads with flat surfaces, but epoxy resin is also a good alternative. For glass beads, use jewelry adhesive (I used E-6000) to glue the bead to the desired image. Wait for glue to dry completely before cutting out the bead, and gluing to the empty pendant.

For epoxy resin, cut out the image and glue to the pendant, then follow the instructions on the packet to use the resin.

IMPORTANT: Be sure you print the image on glossy paper (like photo paper). Otherwise the glue/resin will seep into the paper and make the color wrong.

The pendant for my bird necklace doesn't have a brooch, but it has loops on the side where rings might be attached, so I used that to sew the pendant to the rest of the necklace.

Once you have your pendant, you'll want to find some ribbon and lace. 


The ribbon I found was a bit too thin, so I sewed two pieces together, making it just slightly wider than the lace.

Now everyone can take a minute and mock my terrible sewing skills.


The width ended up to be just over 2cm. You might want to go for 2~2.5 cm for a more authentic look. 

Then it's time to sew on the lace. As you can tell from the photo above, my sewing skills are terrible, so I can't give much advice there except the totally obvious don't t let your thread show in the front.

Next, wrap the necklace around your neck and mark where you want the closure to be. You want your necklace to fit snugly against your neck, so do make sure your measurements are exact. Velcro is a good choice if you want to be able to adjust the size with ease. If you're using invisible snaps like I did, measure the spot well and don't repeat my mistake of sewing the buttons on the wrong side. 

Combine pendant and ribbon, and voila! Your very own necklace.


A crap picture of me wearing it with my new dress XD 

I find that it's very wearable, it goes with a bunch of my outfits both casual and dressy, and every once in awhile I see someone on the street that recognizes it and makes a good conversation starter. 

If you do make one, leave a photo so I can see~ =D


1.20.2014

The Hobbit- Desolation of Smaug (spoilers!!)

Goodness, I had this in draft for ages and forgot to press the 'publish' button. Oops. Well... it's here now..
   
I know I'm very late to the party with this review, but I actually saw the movie the day after it premiered in Taiwan and another time since then! My progress with the dwarfs have been heavily delayed (I'll get them finished by the time the trilogy ends, I swear!!), so four dwarfs (five if you count in my friend Glen wearing his bearded helmet) and a hobbit accompanied my friends and I to the theaters. There were five of us, so each of us took a dwarf/hobbit.

Here they are lined up on the table at the food court awaiting our selection <3

Anyway... onward with the movie!

I loved it!!! So much that I went and saw it again the week after, which might now sound like much but I hardly ever do that. I liked An Unexpected Journey, even though parts of it feel kind of slow, namely the part with Radagast and the introduction of the dwarfs. I understand why the latter is necessary though, and I love it wholeheartedly because of Richard Armitage singing >////<

The Desolation of Smaug, on the other hand, is just full of action and keeps me on the toes the entire time. There are so many things I love about this film that I hardly know where to begin!


Okay, first let us bath in some Legolas-goodness. 

I was actually thrilled to hear that they are bringing Legolas in the trilogy, even though he's not in the novel. I have my doubts about it making the film better in general, but I knew that it would definitely be a plus for my fangirl heart. 


It's actually the original character Tauriel that bothered me. I thought it might turn into some sappy romance and take Legolas from us  take away from the dwarfs.

As it happens, I absolutely LOVE her!!! She totally kicked ass in this film. I loved the part where she asked Legolas "Are we not part of this world?" She's strong-minded and has different ideas about the world and her part in the world than other elves. No wonder Legolas has a crush on her.

There's a sort of love triangle between her, Legolas and Kili. Kili totally had Legolas beat, with all the talk about promises and starlight and moon-rise. Some people hated it. I thought it was cute. It would have been nice to see more of her ideals motivate her actions, since running after the dwarfs to Laketown and leaving Legolas to get beat up by orcs to save Kili... a lot of her actions in the second half of the film seemed to be motivated by her feelings for Kili (honestly though, who can blame her?)

Moving on, another of my favorite aspects of the movie... Thranduil!!!

The way he moves and the camera angles... for a while I forgot if I was watching the Hobbit or New Zealand's Next Top Model!! I gave an  involuntary squeal when he swooped (yes, swooped, not bent) down to talk to Thorin. Loved Lee Pace's performance!!

Then there's the barrel scene!! I loved how it was fast-paced, exciting, yet so much fun (not to the dwarfs, but certainly for me it was) at the same time. Sure, the fighting is synchronized to the point that it's kind of unrealistic, but I enjoyed it through and through.

And of course, Smaug. Benedict Cumberbatch's voice, need I say more? I was silently screaming in my seat. It's everything you could ever wish for in a dragon, that's all I gotta say. I just can't help but imagine Benedict prowling around with motion sensors all over though XDD

It's so nice to watch this with a bunch of crazy fangirls. We knew just the right moment to turn to each other and grin, or grab each other in a silent fit of giggles.

I can't wait for next year.

After the Hobbit, we went to a restaurant called Dream of  Hobbiton for a late lunch/early dinner. The owner is a huge LOTR fan and had a collection of swords and other props that you could play with!!!!


Last but not least, a photo of Glen in his dwarf beard, posing before the Christmas tree in Taipei Main Station.


12.25.2013

[DIY] Honey-Lemon Slices

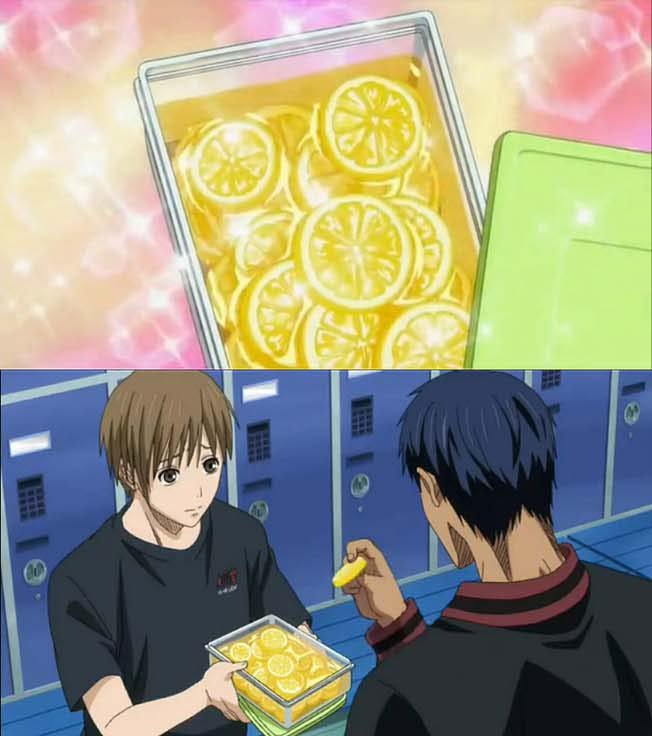
    I was watching Kuroko no Basuke last year and saw the episode where they had these honey-lemon slices after a game. I remember seeing it in Nodame Cantabile, and a number of shoujo mangas as well. It always look so delicious... when made correctly, of course. Somehow these lemon slices are usually a good indicator of whether or not a character is good at cooking.


Heaven vs Hell XDD

I can't say that I am a good cook, but I'm pretty sure I can manage to remember to slice the lemon first XD So last year I badgered my roommate Esther to make it with me. We made two batches in total, and I don't know if it's because we didn't leave it in the honey long enough or what, but the whole thing came out a bit bitter. It's still pretty good for making tea with, and the thinner slices tastes alright, but we weren't really wowed by the final product. 

Here's a photo of last year's batch. We actually did it with limes. This photo was taken before we sealed it.

This year I went shopping at the local grocery store and saw that they had beautiful looking lemons, so I bought some honey and attempted it again. This batch turned out marvelously.
It's starting to get cold here in Taipei, and I've been having cold symptoms all week. A few slices and a few spoonfuls of the honey in a cup of hot tea down and all my symptoms cleared up like I had imagined them!

To make some honey-lemon slices yourself, you'll need:


  • A jar or container that can be sealed airtight. 
  • lemons (as much as you like)
  • honey (as much as you need to cover all the lemons you're using)
  • salt


So here's what you do:


  1. With salt, scrub the outside of the lemon. The idea is to get the bitter oil out from the peel.

  2. Slice lemon into thin slices and layer in container.

  3. Cover lemon slice with honey. Be sure to cover it thoroughly. I do this by placing one layer of lemon slices, cover with honey, place another layer, cover with honey, and so one.  If you're using a jar, don't fill it to the brink. The honey will absorb the moisture from the lemons, so if you fill the jar up it will overflow.

  4. Seal the container and leave for 3~5 days. You can leave it at room temperature or put it in the fridge. It takes longer in a refrigerator.


 This is what this batch looks like after 5 days.

It keeps for a long time, but I'm sure it won't take long for you to finish it =) I use up the honey really fast making tea.

My roommates really enjoyed it, and are now making some themselves. I'm thinking about making some in jars and sending them to my friends over winter vacation.

Been a bit busy lately so many things are currently on hold. I'll post a review of The Hobbit: Desolation of Smaug in the next few days.

Oh and lastly, Merry Christmas, everyone!